Replacing the fan on the IBM PCjr
For the better part of 20 years, I've had an IBM PCjr in my life. My parents first bought one back in 1984-'85ish when they were just starting be discontinued, and it was the thing that launched my interest in computers and especially programming-something I do professionally to this day. Essentially, I owe my entire career and likelihood to that little white box.
The PCjr occupied a small corner of my bedroom; mom would occasionally
use it do print up a banner on the dot matrix printer or perhaps a little word
processing, but for the most part it was all mine, and I was free to tinker,
program, and play games on it, anytime I wanted. I recall several times being
in the middle of a heated and unsavable game of Jumpman
and having to go to bed, but couldn't bring myself to quit, so I would pause
the game, turn the monitor off, and let the machine whir all night long just
a few feet away from my bed. And whir it did. I didn't know at the time what
exactly was making the noise inside the machine-I'd just figured it was the
noise that PCjr's make. Having now owned 2 different machines and working around
at least 4 others throughout my career, I can indeed say that it is a very PCjr
specific tone. In fact, I'd suspect that if you put me in a darkened room and
turned on any number of appliances, from hair dryers to VCR tape rewinders,
I'd know the instant the you turned on a PCjr from the tone of the machine itself.
So I recently took it upon myself to finally inspect the source of the noise
and see what I could do about it. (yes, I still have and love my PCjr, and I
assume you do as well if you've read this far) Replacing the fan in the PCjr
turned out to be one of the easiest and quickest computer mods I have ever performed.
Now that the mod is finished, I find myself wanting to turn it on just to hear
what I'm no longer hearing!
1) Open the case. You probably know how to do this already-just pop a flat blade screwdriver into the 2 slots on the back and pry the top off. My machine no longer needs the screwdriver it's been opened enough times.
2) Pull off the floppy cable and remove the floppy controller board just to get them out of the way.
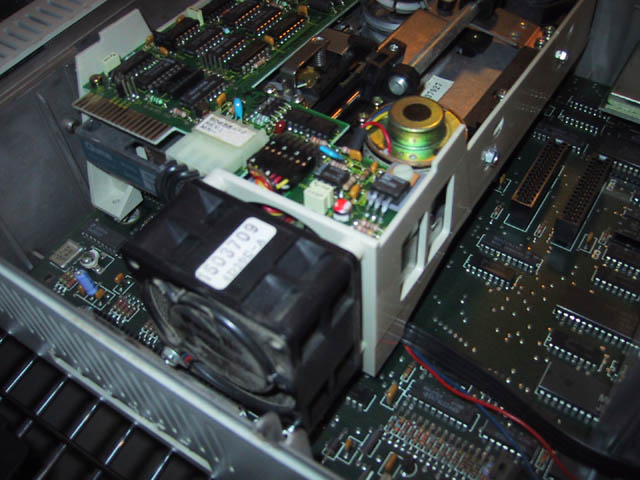
3) The culprit is this thing, mounted
on the back of the floppy drive:
What a massive fan!
I'm not exactly sure what in the world on a floppy drive could possibly heat
up enough to require that much airflow, but the fact that the fan is mounted
directly on the plastic housing is what I believe is giving the PCjr its unique
sound.
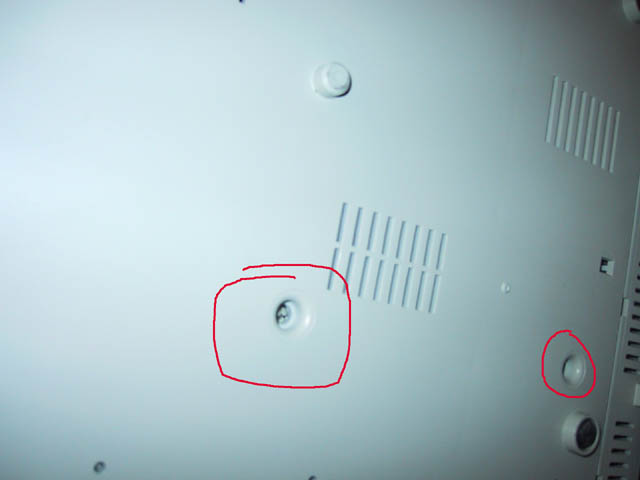
4) The floppy drive is held in place by 2 little plastic nubbins located on
the underside of the case. Just push your flat blade screwdriver around on them
and push them up from the underside. Took a bit of pressure, but you'll get
it. Being an IBM product, I am absolutely amazed at how easily the drive came
off. I was expecting at least 4 dozen screws.
5) The backside of the floppy drive should now lift out of the case so you can
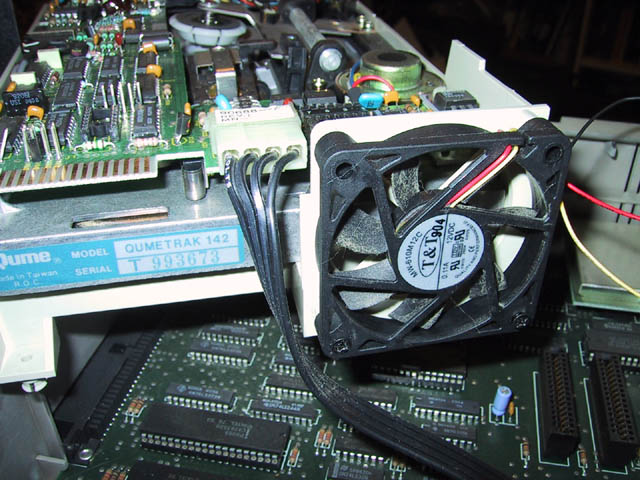
work on it. Unscrew the 2 screws on the bottom of the fan-they're like 3"
long. It's a standard 60mm fan, which you should be able to pick up from virtually
any computer store. Note also that the fan is drawing air *away* from the floppy
drive and pushing it toward the back of the case. There are vents there, but
I can't see that there's a whole lot of airflow happening anywhere in this thing.
6) Follow the fan's wires back to the power supply and unplug it. Notice that the fan's power connector is a fairly standard 3-wire jobby, just like it would be on a modern PC motherboard, except only 2 wires are used, since there was no such thing as temperature/fan monitors back in those days.
7) I used a 60mm fan off a Pentium-200 CPU cooler. It already had the exact 3-wire plug-in that is needed to connect to the power supply, except the wiring is wrong (obviously we don't need the tachometer wire) and the +12v and ground pins were backward. It's easy enough to push the wires out of the connector and reorganize them, with the help of a paper clip and some patience.
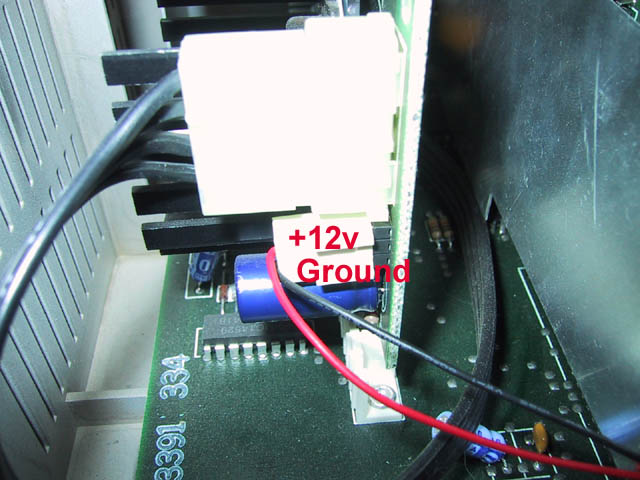 Of the 3 connectors, the top most is not connected. The one in the middle is
12v, and the bottom is Ground. Use a multimeter if you're unsure.
Of the 3 connectors, the top most is not connected. The one in the middle is
12v, and the bottom is Ground. Use a multimeter if you're unsure.
8) Mount the fan back onto the back of the floppy drive. I ended up using the same screws that came with the new fan instead of the behemoths that came with the PCjr fan. You should probably make sure the airflow is the same with the new setup as the old clunker, but I have a suspicion that it really doesn't matter too much.
9) Put the drive back into place so the feet poke through the bottom of the case again and push down. It took a considerable amount of effort, but eventually the drive just snapped back in and was as secure as before. Hook up the floppy cable and re-install the floppy controller, put the lid back on and you're done.
10) Power it up and hear the difference! Now if only we could do something about the floppy drive seek noise. (just kidding, I find that rather endearing)